This deployment guide contains all the information that is applicable to successfully deploy Beast Core to commercial platforms. This is possible through the Beast Code Application Suite (BCAS).
BCAS is a collection of lightweight web applications (or plugins) that can work independently and integrate into Beast Core. Beast Core provides the foundation for these plugins to work seamlessly together as one cohesive user experience.
This is all possible thanks to the plugin architecture that Beast Core and BCAS subscribe to. By following standards maintained by Beast Code, third parties can create their own plugins for use within Beast Core or with any of the web applications and services owned by BCAS.
1 - Introduction
1.1 - Software Use Cases
GOAL: Help advance organizational initiatives using modern, open digital technologies.
One-stop shop for full lifecycle support; break down silos.
Development and source selection.
Operational situational awareness through live system data.
Maintenance and logistics.
Training.
Digital twin capability across Program Executive Offices/Special Projects Office, vendors, and classifications.
Transition support form Legacy to Modern Systems.
Systems of Systems - Single pane of glass view of family of twins in the one environment.
Help shape Request for Proposal (RFP) development to empower improved source selection in common environment…better compare apples to apples.
Live Sensor integration allows CBM+ capability of life cycle saving and real-time situational awareness.
1.2 - Typical Customer Deployment
Beast Core utilizes a single platform deployment, and it is illustrated in Figure 3 of the Section 3: Architecture Design section.
1.2.1 - Resource List
Proficiency with Kubernetes, Helm, Docker, and Azure.
The Beast Core Helm Chart(s), provided by Beast Code.
The images used by the Helm chart, provided by Beast Code.
The digital twin, provided by Beast Code.
A cluster on AKS. Beast Core v6 uses Helm charts which require a Kubernetes cluster.
K8s objects created during Helm install.
Network Load Balancer, which is usually automatically created when a cluster is created.
1.3 - Deployment Options
Deployment option: Single Platform. This deployment targets one physical asset. When the application is opened, the user will immediately see that asset.
1.3.1 - Resource List
This portion of the task is not applicable, as Beast Core doesn’t have options in a list format.
Here’s a list of Azure Standard Resources:
Azure Files
Azure Virtual Machines
Azure Container Registry
AKS
A cluster on AKS (Azure Managed)
1.4 - Time Estimate to Deployment Completion
The expected time to deploy Beast Code within Azure is one to two days.
1.5 - Supported Regions
Beast Code is supporting all 50 United States and no foreign countries.
The supported Azure Regions for Azure SQL Database, Database for MySQL, and Database for PostgreSQL are:
US Gov Arizona
US Gov Texas
US Gov Virginia
2 - Prerequisites and Requirements
2.1 - Technical Prerequisites and Requirements
To deploy Beast Core v6 on Azure, the user will need:
The Beast Core Helm Chart(s), provided by Beast Code.
The images used by the Helm chart, provided by Beast Code.
The digital twin, provided by Beast Code.
Bash or GitBash along with the following commands: docker, kubectl, helm.
These skills are required to successfully deploy Beast Core on Azure:
Kubernetes
Helm
Docker
Bash
Azure(Microsoft Entra ID, Azure Kubernetes Services, Azure Virtual Machines, Azure Files, Azure DNS and Traffic Manager, Key Vault, Azure Container Registry)
2.2 - Deployment Environment Configuration
To run the Beast Core Experience, the following steps need to be implemented. The following instructions are based on the Azure Web Interface.
To create a cluster using Azure CLI, see: https://learn.microsoft.com/en-us/azure/aks/tutorial-kubernetes-deploy-cluster?tabs=azure-cli
Create a Kubernetes Cluster.
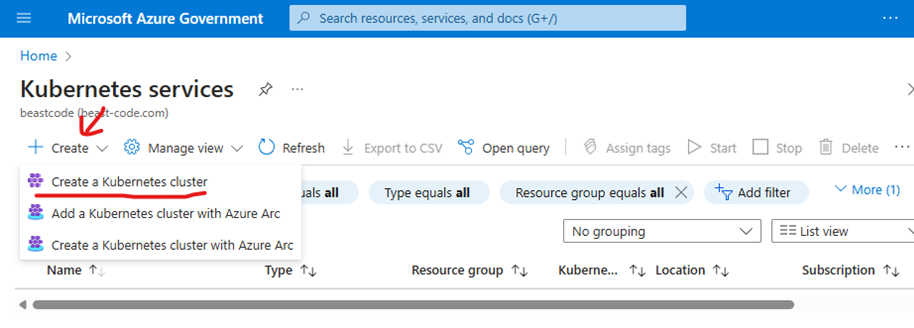
Figure 1. Kubernetes Services
By default, you will have the
BasicsTab selected.
Figure 2. Create Kubernetes Cluster
Fill in/Select the required fields:
Choose your subscription.
Choose or create your Resource group.
Select your Cluster preset configuration.
Create a name for your Kubernetes Cluster.
Select your region.
AKS pricing tier can be either free or standard.
Select a Kubernetes version.
Beast Core works fine with the default version.
Fill in optional fields as needed.
No changes suggested for the
Nodes poolstab. Modify as you see fit.Beast Core was successfully deployed using
Standard_D4ds_v5nodes, which include:1 node pool
2-5 node count
No changes suggested for the
Networkingtab. Modify as you see fit.In the
Integrationtab, you may connect your cluster to an existing Azure Container Registry or create a new one.You must have user access administrator role or a subscription owner role to do this.
In the
Monitoringtab, if you do not have or use Prometheus, make sure to uncheck that option.No changes suggested for the
Security,Advanced, orTagstabs. Modify as you see fit.
3 - Architecture Diagrams
3.1 - Deployed Services and Resources
The architecture diagram below displays the relationships between Beast Core, Azure Services and resources, and how connections to the Client/Customer are established.
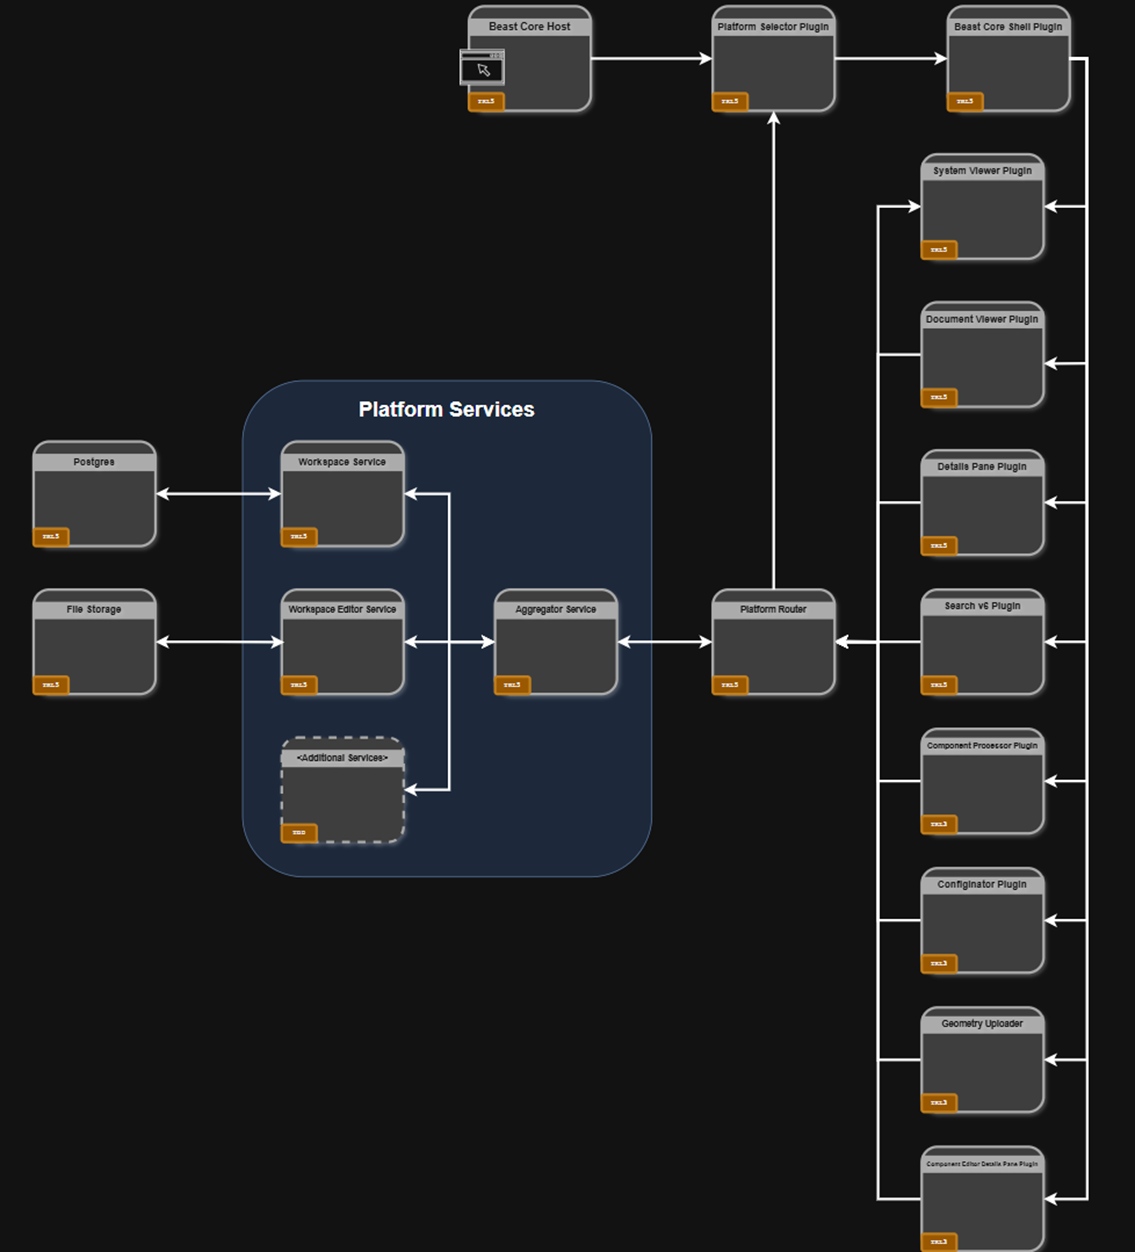
Figure 3. Internal Architecture Diagram
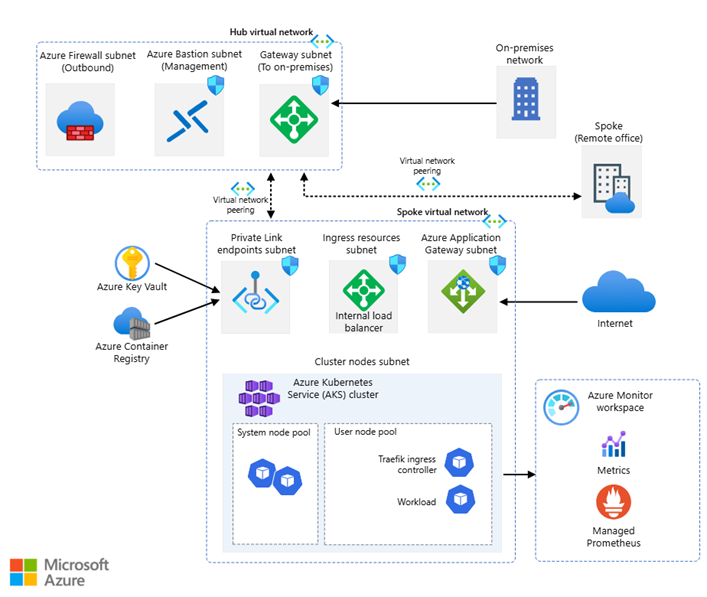
Figure 4. External Architecture Diagram
3.2 - Network Diagrams Demonstrate Azure’s Virtual Network (VNet) and Subnets
This task is Not Applicable in Beast Core. Beast Core uses the default Network settings. For information on Networking in AKS, see: https://learn.microsoft.com/en-us/azure/aks/concepts-network
3.3 - Integration Points
The architecture diagram in Figure 4. External Architecture Diagram includes integration points, including On-Premises and Remote assets.
4 - Security
4.1 - Does Not Require the Use of Azure Account Root Privileges for Deployment or Operation
Beast Core does not recommend, nor does it require, the use of Azure account root privileges for deployment or operation.
4.2 - Provides Prescriptive Guidance on Following the Policy of Least Privilege for All Access Granted as Part of the Deployment
Strategy regarding permissions for access to Beast Core is the responsibility of the customer/license holder. To access AKS Service Limits Documentation, use this link: https://learn.microsoft.com/en-us/azure/aks/quotas-skus-regions
4.3 - Public Resource Documentation
Beast Core makes use of/requires no public resources for any customer’s successful deployment.
4.4 - AKS Access and Identity Management (IAM) Role Purpose and IM Policy
While the deployment is in-progress, the only Identity required is an administrative ID to complete the deployment. Beast Core operates independently of Azure/AKS IAM.
An Administrator Access policy is required, establishing and documenting roles and policies that are above the scope of a Power User. An Azure Administrator is also required to create and administer the cluster for the deployment.
4.5 - Purpose and Location of User Created Keys
This task is not applicable to Beast Core as no keys are required for this deployment.
4.6 - Maintaining Stored Secret Instructions
This task is not applicable as there are no secret instructions stored within Beast Core.
The customer should create a public certificate to add to the ALB in order to enable https. See Deployment Assets section steps 4 and 5 of the deployment guide.
4.7 - Customer Sensitive Data Storage
The customer purchasing Beast Core is providing the workspaces, which could expose sensitive customer data. Other classified information may be affected if the customer maintains other classifications within those workspaces.
Potentially sensitive data can be found in the Workspace path that is not applicable within the current constructs of Beast Core.
Note
Later versions with user login might have more potentially sensitive data where user account information is stored, but that does not currently exist.
4.8 - Data Encryption Configuration
This task is not applicable as Beast Core currently has no encryption requirements. Beast Core will link to the AKS encryption options and requirements.
Azure Storage encryption for data at rest: https://learn.microsoft.com/en-us/azure/storage/common/storage-service-encryption
Host Based Encryption on AKS: https://learn.microsoft.com/en-us/azure/aks/enable-host-encryption
Confidential Containers with AKS: https://docs.azure.cn/en-us/aks/confidential-containers-overview
Add Key Management Service etcd encryption to an AKS cluster: https://docs.azure.cn/en-us/aks/use-kms-etcd-encryption
Bring your own keys (BYOK) with Azure managed disks in AKS: https://learn.microsoft.com/en-us/azure/aks/azure-disk-customer-managed-keys
SSL/TLS for AKS: https://learn.microsoft.com/en-us/azure/aks/app-routing-dns-ssl
4.9 - Load Balancer Configuration
One way to let the application be accessible from the internet is to use load balancers. When creating a cluster in AKS, the load balancer is automatically created.
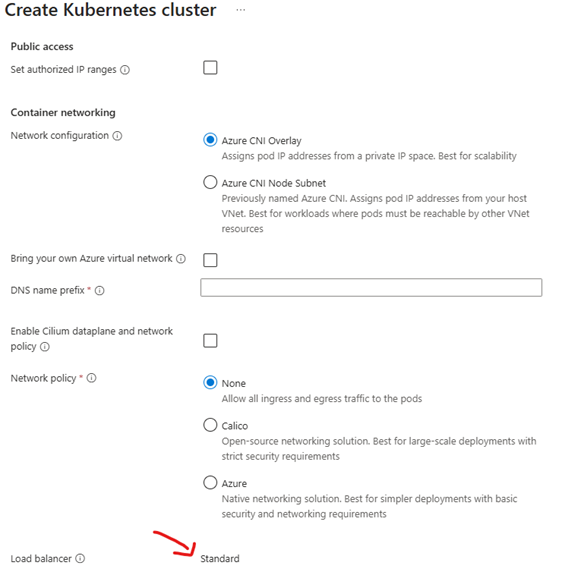
Figure 5. Load Balancer
For more information, see: https://learn.microsoft.com/en-us/azure/aks/load-balancer-standard
4.10 - Application Routing & Ingress
To setup an AKS managed NGINX ingress with application routing add on:
Run
az aks approuting enable --resource-group <ResourceGroupName> --name <ClusterName>Set the ingressClassName in the values.yaml file to
webapprouting.kubernetes.azure.com
Figure 6.
For more information, see: https://learn.microsoft.com/en-us/azure/aks/app-routing
4.11 - Support Customer Ability to Disable Azure IMDS
This task is not applicable as Beast Core does not make use of IMDS.
By default, all pods running in an AKS cluster can access the Azure IMDS endpoint. To see how to block pod access to the Azure IMDS endpoint, see the following documentation: https://learn.microsoft.com/en-us/azure/aks/imds-restriction
5 - Costs
5.1 - Azure Costs
For Azure cost estimates for AKS, VMs, and more Azure services, see: https://azure.microsoft.com/en-us/pricing/calculator/
6 - Sizing
6.1 - Required Resources or Guidance for Type and Size
Beast Code recommends using the basic setup with AKS. When an AKS cluster is created or the number of nodes is scaled out, the Azure platform automatically creates and configures the requested number of virtual machines (VMs). For more information, see: https://learn.microsoft.com/en-us/azure/aks/core-aks-concepts
7 - Deployment Assets
7.1 - Instructions for Deploying the Workload on Azure
For a list of prerequisites, see Section 3: Prerequisites and Requirements.
Create Database Infrastructure
Option 1: Create Database using Azure UI

Figure 7.
Click on
Azure Database for PostgreSQL.Click
Create.Fill out required fields.
Fill out optional fields as needed.
Select the PostgreSQL version. Beast core runs well on v16.
Configure server under
Computer and Storageas needed.Beast Core can successfully deploy on the lowest compute tier, Burstable.
Specs: 1 vCore, 2 GiB RAM, 32 GiB Storage.
Select
Server Parametersand findazure.extensions. Turn on the following:CITEXT
LO
PG_TRGM
BTREE_GIST
PGCRYPTO
Select
Review and Createand create your database.
Option 2: Deploy PostgreSQL in Cluster
Add Bitnami repository.
helm repo add bitnami https://charts.bitnami.com/bitnamihelm repo update
Install PostgreSQL.
Retrieve the PostgreSQL password.
helm install postgresql bitnami/postgresql -n beast-corekubectl get secret -n beast-core postgresql -o jsonpath="{.data.postgres-password}" | base64 --decode
Import Workspace Data to Database
To import a workspace into your database, run the following command:
pg_restore -Fd -j <number of cores> -d <new database name> <database name>.dump -h <server name> -U <user name> 2> errors.log
For more information, see: https://docs.azure.cn/en-us/postgresql/migrate/how-to-migrate-using-dump-and-restore?tabs=psql#restore-the-data-into-the-target-database
Run the HELM Chart
cdinto the beast-core-authors Helm chart.We recommend performing a health check. Run
lsand you should see several folders and files including charts, templates, and Chart.lock, etc.
Run
helm-upgrade --install beast-core-authors -n beast-coreWe recommend performing a health check. Run
kubectl get pods -n beastcoreand verify all pods created in this step areSTATUS == running.
7.2 - Guidance for Testing and Troubleshooting
Testing
Enter the created URL into the browser and ensure the site comes up. Try loading the system to verify connectivity.
Troubleshooting
The Site Doesn’t Load
Try using the URL of the load balancer. If this doesn’t work, enter kubectl port-forward into the host pod. (e.g. kubectl port-forward beast-core-shell-host-799775dfcd-pjm76 -n beast-core 80:9001 ). This will help pinpoint where the problem is.
For more information about kubectl port-forward , see https://kubernetes.io/docs/tasks/access-application-cluster/port-forward-access-application-cluster/#forward-a-local-port-to-a-port-on-the-pod
AKS Troubleshooting
For any troubleshooting related to AKS, see: https://learn.microsoft.com/en-us/troubleshoot/azure/azure-kubernetes/welcome-azure-kubernetes
8 - Health Check
8.1 - Assess and Monitor the Health and Proper Function of the Application
Follow the steps below in order. The steps detail how to assess and monitor the health and proper function of the application:
Set a liveness probe in the values.yaml file (The liveness probe will cause a pod to be restarted if the probe fails).
With the probe(s) set, run
kubectl get events -n <namespace>to see if any pods are frequently restarting.Use the site to ensure functionality is working.
For more on monitoring an AKS cluster, see https://learn.microsoft.com/en-us/azure/aks/monitor-aks?tabs=cilium and/or https://learn.microsoft.com/en-us/azure/azure-monitor/containers/kubernetes-monitoring-enable?tabs=cli
9 - Backup and Recovery
9.1 - Data Stores and Configuration Backup Recovery
The data store for the workspaces is a file system. There are no configurations to back up, only the files themselves. The file system isn’t proprietary, so Beast Code is not required to provide instructions for backup and recovery.
For information on Azure Backup for AKS, see https://learn.microsoft.com/en-us/azure/backup/azure-kubernetes-service-backup-overview
10 - Routine Maintenance
10.1 - Rotating Programmatic System Credentials and Cryptographic
System credentials created in AKS do not interact with the Beast Core program. There is no need to rotate any credentials within Beast Core when AKS credentials change.
10.2 - Prescriptive Guidance on Managing Licenses
The number of allotted licenses versus licenses used will be managed by the license key creation and management module of Beast Core 6. There will be floating licenses which means the number of used licenses cannot exceed the number of allotted licenses. The license users can switch/change, but the number of users logged in using the license count as a used license.
10.3 - Prescriptive Guidance on managing AKS Service Limits
Beast Core has no special requirements; however limits for AKS can be found here: https://learn.microsoft.com/en-us/azure/aks/quotas-skus-regions.
11 - Emergency Maintenance
11.1 - Handling Fault Conditions
In its current version (6.0.0), the software provides no communication if things are not working. Currently, it requires the technician to review the deployment health checks and potentially review any logs that relate to containers failing to provide functionality to Beast Core 6.
11.2 - How to Recover the Software
If the Helm chart or any of the images were deleted or if unwanted changes were made to them, follow these recovery steps:
Look for any copies of the deployment package sent by Beast Code.
If the deployment package cannot be found, contact Beast Code to obtain a current copy.
Once the Helm chart and images are obtained, use them to redeploy Beast Core v6 according to Section 8: Deployment Assets.
12 - Support
12.1 - How to Receive Support
There are three ways to contact Beast Code Support:
Email: The user Point of Contact (POC) can send an email to support@beast-code.com with the issues and Beast Code will create a ticket and address it based on the agreed Service Level Agreement (SLA). This will be part of Standard Tier 1 support.
Phone: The user POC can also contact support by calling the Beast Code support line phone number (850-702-3600 ext. 5) during normal workday business hours (Monday to Friday 8:00AM – 4:00PM Central). This will be part of Extended Support (Tier 2 and Tier 3) agreement.
Help Center: The user POC will also have access to Beast Code Help Center. The POC can open a new ticket as well as view and/or update an existing ticket. This will be part of Extended Support (Tier 2 & Tier 3) agreement.
For more information, see the How to Receive Support article.
12.2 - Technical Support Tiers
Regardless of the channel used to report an issue to Beast Code, the user POC will receive email updates on the progress of the ticket based on the agreed SLA.
Beast Code will also provide an escalation path if the SLA is not followed or the issue resolution is not satisfactory.
The Beast Code SLA support team will be available during regular business hours (Monday to Friday 8AM - 4PM Central) except Federal Holidays.
12.3 - Different Support Tiers and Service Level Agreements (SLAs)
The following content is the complete Beast Code Service Level Agreement 1.0.
12.3.1 - Application Owners
Beast Code will interface directly to the Customer Administrator POC for all matters related to the Beast Code application support. All activities and requests must follow the Beast Code change control process and be approved by the Customer Administrator. Beast Code will not interface with Customer Users without Customer Administrator approval.
12.3.2 - Support Contact Methods
Beast Code Help Desk - support.beast-code.com
Email - support@beast-code.com
Phone - 850-702-3600 ext. 5
12.3.3 - Severity Levels
Beast Code Level 1 and 2 technical support operates standard SLA Initial Response Time hours from 8:00AM to 4:00PM Central Time, excluding Saturdays, Sundays, Federal Holidays, and Beast Code Holidays.
The customer may submit a ticket and access the help desk knowledgebase twenty-four hours a day.
Note
Access to Technical Support is limited to designated administrator(s) for Customer.
Technical Support requests received by the Beast Code Help Desk will be given a Severity Category based on how important responding to the request is to the primary business of the Customer, as well as the availability of resources. Severity categories are as follows:
Severity #1 – a problem has made a critical application function unusable or unavailable and no workaround exists.
Severity #2 – a problem has made a critical application function unusable or unavailable, but a workaround exists; or a problem has made an important application function unusable or unavailable and no workaround exists.
Severity #3 – a problem has diminished critical or important application functionality or performance, but the functionality still performs as designed.
Severity #4 – a problem has diminished supportive application functionality or performance.
Severity codes are used to determine appropriate response and resolution times. Response and resolution times are measured from when the incident is opened by the Help Desk. If the problem is not resolved within the defined timeframe, continuous effort will be applied until the problem is resolved.
12.3.4 - Response Time Definitions
Initial Response is when an open ticket is replied to by Beast Code. Circumstances may make it necessary for the Customer to notify Beast Code about a problem by email or phone; for the purposes of establishing the correct response time, the clock starts request when a ticket is opened by the Customer, or by Beast Code on behalf of the Customer.
Subsequent Response is the frequency with which the Customer is updated on the resolution status.
Resolution is the point at which the request is resolved.
The table below represents standard response times. Beast Code will work with the Customer to determine actual severity.
Table 1. Severities and Standard Response Times
Severity Code | Initial Response | Subsequent Response |
1 | Within 4 hours | Within 8 Hours after initial response |
2 | Within 8 hours | Within 24 Hours after initial response |
3 | Within 24 hours | Within 48 Hours after initial response |
4 | Within 48 hours | Within 5 Business days after initial response |
12.3.5 - Enhancements
Enhancements are site features that are either missing or not operating as desired (though operating as they were designed). This includes the following types of activities:
Application Changes: Modifications to any application hosted on the site. This includes adding features, capabilities, etc.
Application Features: This entails adding features or capabilities to the application.
Database Modifications: Changes to the data or database.
Enhancements will be defined, estimated, prioritized, and managed by Beast Code. Enhancements that require additional resources to complete due to Customer deadlines, schedule requirements, complexity, or scope will be executed through a formal Statement of Work (SOW) at Beast Code.
Beast Code will work with the Customer to define the requirements and acceptance criteria.
Beast Code will periodically enhance the Beast Code Application System at its own cost and extend new capabilities to Customers. There is no additional cost for access to these new capabilities, and Beast Code will define the release schedule for the internal enhancement efforts.
12.3.6 - Approval and Acceptance
Acceptance of the Services and each Deliverable shall occur only when:
Beast Code has corrected necessary defects identified during testing.
Beast Code has provided to the Customer all services and deliverables required to be provided to Customer pursuant to the applicable SOW.
Customer notifies Beast Code in writing that all testing for the services and deliverables, as applicable, has been met to Customer’s satisfaction.
Nothing else, including the Customer’s use of the services or a deliverable, or any portion thereof, in a live, operational environment, shall constitute Acceptance.
12.3.7 - Request Ticketing System
Beast Code will maintain a Ticketing System for all work, errors, bugs, and enhancements requested by Customer to be fulfilled by Beast Code.
The appropriate Customer personnel will make a request via a ticket to Beast Code. If the request is accepted, the ticket will be added to Beast Code’s backlog. Beast Code will determine prioritization of the ticket. When work is started on the request, the activity will be marked as in-progress. Upon completion of the task, the activity will be marked as ready for review. Upon approval, the changes will be migrated to the User Acceptance Testing (UAT) environment for testing and final approval. Lastly, the changes will be migrated to the production systems and the task will be marked as complete. The originator of the request will receive an email indicating that the activity is complete.
If a problem arises after the change has been launched, a new ticket must be submitted for that problem. The Ticketing System provides a reporting mechanism for all requests. Beast Code will provide a detailed invoice to the Customer for any activities requiring additional resources via a formal SOW.
12.3.8 - Customer Response Expectations
At times, Beast Code will need feedback or decisions from the Customer to complete tasks. To assure effective use of resources, Customer Administrators are expected to respond to normal requests via email or phone within two business days. Delays in or lack of response will impact deadlines and delivery schedules.
12.3.9 - Reporting Requirements
Beast Code will maintain an activity tracking tool that will enable the customer to pull real-time and historical work reports.
Where needed, Beast Code and the customer may agree on an alternate reporting format on a case-by-case basis.